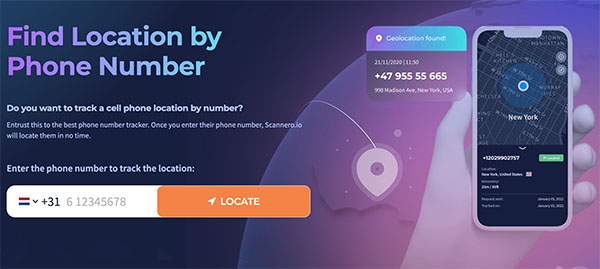
Speeding up your mobile website is no longer a “nice to have” undertake, especially since, according to Gartner, mobile usage has already surpassed desktop usage in 2020 and mobile traffic is expected to rise to 59% in 2021. When your mobile website or app is clumsy or slow, 29% of smartphone users will immediately switch to another site or app if it doesn’t satisfy their needs (that is, they can’t find information or it’s too slow). In fact, of those who switch, 70% do so because of lagging load times, while 67% will switch if it takes too many steps to purchase or get desired information. In other words, optimizing your mobile users’ experience is key to your business.
Throughout this post I’m going to cover the critical aspects of optimizing a mobile experience and although this is a technical topic by definition, I’ll try to skate around the technicalities and offer hands on approaches you can follow to improve your own mobile websites’ performance. Here’s what you’ll gain by reading and applying the solutions in this article:
- You will decrease your mobile website’s loading time. In other words, users will be able to access your mobile website much faster and they will thank you for it.
- In case you have a large audience, you’ll want to employ these practices as soon as possible. Performance optimization will decrease the strain on your server, thus lowering your web hosting costs.
READ ALSO: 10 Best Phone Tracker Apps Without Permission: Top Picks to Get the Truth
Google PageSpeed Insights is your friend
The best tool out there is Google’s PageSpeed Insights (PSI). It can run a diagnosis on your website’s mobile & desktop versions and provide you with clear indications about what you need to fix.
Even though PageSpeed Insights is a tool built for developers, I’ll do my best to “translate” its how-tos into a non-technical language. I hope this will help you understand where you need to optimize your mobile presence and why.
The only thing that you need to do is go to PageSpeed Insights and add you website’s address. You will end up with a report that looks like the one below:

Keep in mind that the tool will not scan your entire website (all pages) and this report is generated only for the address you have entered. PSI will also calculate a score that tells you how optimized that page is. A score of 100 means it is fully optimized, although in real life you’ll rarely see that (even google.com has a score of 59 on mobile). Just aim for achieving a reasonable score (ex. in the 60-70 area) and try to solve any problems that are marked with red.
Next, I’ll go over the key points that might be revealed by a PSI report. If you can solve these, your website’s score will improve significantly. Each point that you’ll need to fix has a “Show how to fix” link attached to it. Clicking on that will show you what are the exact problems that you need to address.
Let’s begin.
1. Leverage Browser Caching
From the PSI docs:
Fetching resources over the network is both slow and expensive: the download may require multiple roundtrips between the client and server, which delays processing and may block rendering of page content, and also incurs data costs for the visitor. All server responses should specify a caching policy to help the client determine if and when it can reuse a previously fetched response.
What PSI is trying to tell you is that you are not taking advantage of the mobile browser’s capabilities. Modern browsers today can keep a copy of the files that are required to display your website. The files are saved on the user’s device the first time that he or she lands on your website. The next time the mobile user navigates to a page or refreshes the current page, it will load much faster because some of the content is already downloaded and stored in the browser’s memory.
This technique is called “browser caching“.
Usually, you’ll want to cache styling sheets or images because these consume the most bandwidth and take a long time to load. For example, you don’t need to cache an article’s text content (in fact, PSI doesn’t check text content), but the images used inside the article must be cached.
As an observation, some of the things that show up as non-cached might be out of your control (Ex. external libraries used for analytics). If these are preventing you from achieving a reasonable PSI score, you can drop them, but usually they shouldn’t represent a problem.
How to solve it
Assuming you are using Apache as your web server, browser caching can be implemented quickly by adding a few lines of code in a file called .htaccess. If you don’t know if you are running on Apache or not, just ask your hosting company.
The .htaccess file is found in the root folder of your website and can contain different instructions, like redirects, caching or compressing files (see more about compression in the next section), so be very careful when editing it. These are the lines of code that you can add to cache styling sheets, images and other files from your website:
ExpiresActive On
ExpiresByType image/jpg "access plus 1 month"
ExpiresByType image/jpeg "access plus 1 month"
ExpiresByType image/gif "access plus 1 month"
ExpiresByType image/png "access plus 1 month"
ExpiresByType text/css "access plus 1 week"
ExpiresByType application/pdf "access plus 1 month"
ExpiresByType text/x-javascript "access plus 1 week"
ExpiresByType application/x-javascript "access plus 1 week"
ExpiresByType application/javascript "access plus 1 week"
ExpiresByType text/javascript "access plus 1 week"
ExpiresByType image/x-icon "access plus 1 year"
ExpiresDefault "access plus 2 days"
If you’re not comfortable editing your .htaccess file, ask your hosting company to edit it for you. Keep in mind that any changes you make to cached styling sheets or images might not be immediately visible in your mobile browser. To ensure that you are seeing your website’s latest version, clear your browser’s cache or use incognito mode.
The above approach works only for files that are hosted directly on your server. Files that are hosted on a content delivery network such as Amazon’s S3 are handled differently.
You should know that if you’re using WordPress, there are tons of caching plugins out there that can help you add browser caching. From the WordPress docs:
Plugins like W3 Total Cache or WP Super Cache can be easily installed and will cache your WordPress posts and pages as static files. These static files are then served to users, reducing the processing load on the server.
So, these plugins will do more than browser caching, they will also change the way the content is being loaded from the server. Even though they can improve your website’s speed, you shouldn’t use them as a quick patch if your website is experiencing loading issues because it has too many installed plugins. Make sure to keep your WordPress updated and try to keep your plugins’ numbers at bay.
2. Enable Compression
From the docs:
All modern browsers support and automatically negotiate
gzip
compression for all HTTP requests. Enablinggzip
compression can reduce the size of the transferred response by up to 90%, which can significantly reduce the amount of time to download the resource, reduce data usage for the client, and improve the time to first render of your pages.
This sounds rather cryptic, but it can be quickly understood if you think about archiving a file. Modern browsers have the capacity to interpret archived files. So, if your server sends out a compressed file, the browser will know how to “unpack” it and properly use it.
It’s easy to see why this particular practice will greatly speed up your website. Archived files will have a size that is a few times lower compared to the original. Yet, this applies to text files (ex. styling sheets or other code used to display the page) and doesn’t impact images. For images, you have to use a different technique.
How to solve it
Like browser caching, file compression can be implemented by adding a few lines of code in your .htaccess file:
<ifModule mod_deflate.c>
<filesMatch ".(css|js|x?html?)$">
SetOutputFilter DEFLATE
</filesMatch>
</ifModule>
These will ensure that all styling sheets, JavaScript files and HTML pages are archived before being shipped by the server.
3. Optimize images
From the docs:
Images often account for most of the downloaded bytes on a page. As a result, optimizing images can often yield some of the largest byte savings and performance improvements: the fewer bytes the browser has to download, the less competition there is for the client’s bandwidth and the faster the browser can download and render content on the screen.
Besides a few elements that are used for styling (ex. your logo), most images are part of the content, so they are the first thing that you need to pay attention too. PSI will also tell you how much KiloBytes you can save by optimizing each image. Depending on that, you can focus on those images that are causing the biggest issues.
How to solve it
Google has an entire guide about optimizing images, but the main points that you need to keep in mind are:
- Don’t use images that are too large compared to how they are displayed. For example, don’t use a 3,000 x 3,000 pixels image if the user will only see it at a 500 x 500 size.
- Reduce the quality of the images. Lower quality means a lower size, so bring it down as much as possible without making it look bad.
- Take into consideration using responsive images:
The aim of responsive images then, is not to deliver a higher quality image to screens that can display it (which we can do easily), the aim is to deliver the highest quality image supported and nothing more.Although responsive images are not supported out of the box by all mobile browsers, they will most likely become a standard in the future.
Again, if your website is WordPress based, notice that as of WordPress 4.4, images are responsive by default. If you are on WordPress 4.4 or plan to update, you will not need to install any special plugins.
4. Minify CSS, Minify JavaScript and Minify HTML
From the docs:
Minification refers to the process of removing unnecessary or redundant data without affecting how the resource is processed by the browser – e.g. code comments and formatting, removing unused code, using shorter variable and function names, and so on.
While this is all very technical, it actually says that you can lower the size of your files even further, by eliminating some unwanted text from them.
This rule applies to styling sheets (CSS) or code used to display the page (JavaScript & HTML). Un-minified files will contain extra text that is not useful to the browser – for example, spaces are crucial for making your articles readable, but they are of no use in a styling sheet.
How to solve it
There are several online tools that you can use to minify files. Just to give a few examples, you can check out:
- JSCompress for JavaScript
- CleanCSS for styling sheets
However, you should also keep a copy of the un-minified files in case you’ll need them for later editing.
5. Eliminate render-blocking JavaScript and CSS in above-the-fold content
From the docs:
CSS: Before the browser can render content it must process all the style and layout information for the current page. As a result, the browser will block rendering until external stylesheets are downloaded and processed, which may require multiple roundtrips and delay the time to first render.
JavaScript: Before the browser can render a page it has to build the DOM tree by parsing the HTML markup. During this process, whenever the parser encounters a script it has to stop and execute it before it can continue parsing the HTML. In the case of an external script the parser is also forced to wait for the resource to download, which may incur one or more network roundtrips and delay the time to first render of the page.
All the PSI rules that we’ve covered so far referred to how to load a page’s resources (cache, compress, optimize and minify them). However, this particular point is all about when to load files.
Each page on your website has a section called “head“. Among other things, this section is used to specify that files should be loaded from the server before the browser begins to display the page. During that time, the mobile users won’t see anything on their screen, so it makes sense to limit the number of files loaded in the page’s head section. This is exactly what PSI is trying to tell us.
However, this rule shouldn’t be a deal breaker.
For example, you’ll usually want to load the styling sheet before the page begins to display. Why? Because otherwise, mobile users might see a bunch of HTML text before the styling is applied. This is exactly how Google’s search engine sees your website (since it doesn’t care about styling), but of course it is not something that you’d want your mobile users to see.
Also, this rule doesn’t apply to mobile web apps (single-page applications). Mobile web apps are composed entirely out of JavaScript code, that handles the communication with the server and displays your content. Without this code, the mobile user won’t actually see anything in the browser, so, in this case, the JavaScript libraries should also be loaded in the page’s head section.
How to solve it
I would list this point as optional because it greatly depends on how your mobile strategy is implemented. This is an issue that you can discuss with a developer and decide together if it’s something that should be taken into consideration.
READ ALSO: How Can I Monitor My Child’s Text Messages Without Them Knowing: 2023 Edition
Where Google PageSpeed Insights falls short
While Google PageSpeed Insights is a great tool, it has a few important disadvantages:
- It will only check one page at a time. If you have a website with a lot of pages, it will be next to impossible to verify each one of them in this way.
- You have to decide what points you should fix and what points you should skip. Ideally, you would want to fix them all, but as we’ve seen, that is not always possible.
Ever since we launched our mobile audit service last year, we analyzed dozens of mobile websites and we came to realize that we need to build our own “all-in-one” tool that would help us produce the best performance report for our customers.
As you can imagine, what I’ve covered here is just the tip of the iceberg when it comes to mobile performance. We usually look at other aspects such as: page size, page height/length, mobile SEO but also UI/UX and security aspects, not to mention business related topics which we’ve thoroughly described in First Steps To Understanding Where Your Mobile Presence Fails.
Google’s Accelerated Mobile Pages (AMP) project
An article about performance optimization wouldn’t be complete without mentioning Google’s AMP project. From the docs:
Today, the expectation is that content should load super fast and be easy to explore. The reality is that content can take several seconds to load, or, because the user abandons the slow page, never fully loads at all. Accelerated Mobile Pages are web pages designed to load instantaneously – they are a step towards a better mobile web for all.
The idea behind the project is to use a set of stripped down HTML and disable third party scripts / libraries, thus making a page load much faster. In addition, images (and other embedded content) are requested by the page after it has loaded and placed in predefined spots. By using this approach, an Accelerated Mobile Page will actually control the loading of resources instead of trusting the browser to do its designated job.
Since the AMP project is quite new, it still has some things to figure out:
However, by stripping down the experience of using the mobile web, Google is stripping out a lot of the infrastructure advertisers and marketers currently depend on to deliver impactful brand messages to users.
Even so, you should definitely check it out, as it promises to solve a lot of the performance issues we’re seeing on the mobile web today.